The performance of many private water wells varies seasonally; therefore, well owner maintenance and performance checks should be adapted to fit these seasonal changes.
The demands we place on our private water wells is typically not the same day after day all year long. Most well owners will use their wells more for landscape irrigation during the spring and summer than in the fall and winter. Seasonal use changes can impact the operational mode and performance of a well and it can even cause changes to take place in a well’s water quality.
Let’s start by considering the year around use of a private well in a regional environment where there are hot humid summers and long, cold freezing winters with year around single-family use. Where the well is in almost constant use year around, a routine well inspection and maintenance could mean a once a month walk around, looking at and inspecting essential components of the system.
Just as important as performing the inspection and checking the water system is making a repeatable documentation of what you saw and checked. Your memory may be great today but photo and written documentation is far better and more reliable when it comes time to service the well.
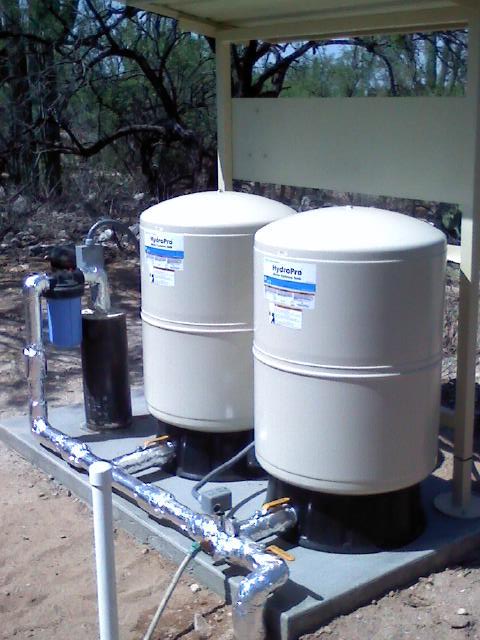
Two tanks and a well
There are exceptions to the most common use cycles because some private wells across the South and Southwest are used only during the fall and winter months and are almost totally unused during the summer months. We call these “Snowbird wells.” These wells would be in sharp contrast to mountain and lakeside cabin wells that are used exclusively in the summer and not at all during the winter months.
A majority of the private wells are used year around and thus these wells must endure both torturous summer heat and bone chilling freezing weather. Each environment and each type of well requires a different seasonal well owner maintenance program.
Starting Point: Get and have on hand a detailed record of your well’s construction, equipment installed, static water level, and basic water quality. Keep this information up to date each time it is serviced or tested. Then begin a program of well inspections and performance check to go with the basic data.
Step 1 of a Private Well Inspection and Maintenance Program. If you see it, photograph it. If you check or measure it, write down what you saw. Build yourself a notebook or well inspection and maintenance record to properly manage your most precious real property asset, your well.
Step 2. Conduct your inspections and maintenance check at equal periodic intervals. First of every month, or the middle of every month, it doesn’t matter. Consistency is preferred and the same level of attention or accuracy should be applied for the data to have meaning.
Step 3. Compare the observations you see today with those you photographed in the past. Look for changes in the growth of weeds, bushes, or trees or evidence of standing water around the well head.
Step 4. Collect and test a water sample from the well at least once a year and after any servicing or major maintenance of the well or system components.
Step 5. Review and compare your measurements or reading periodically and look for subtle changes in the components that you are monitoring or water quality changes.
What steps can a homeowner do in a seasonal inspection and maintenance program? Here are some suggestions.
Walk around your well head to look for anything that might be intruding into a clear zone of a minimum of 40-foot radius around your well. Make sure there are no trees with potentially deep penetrating roots that might get into your well casing. Make sure that the land around your well head slopes away from it sufficiently that no water ponds there. Do not have or allow any petroleum products or hazardous chemicals to be stored or used around the well. Check that vehicle access to the well head has not been restricted by erosion, growth, or manmade obstacles. If it has, I suggest you remove them before it’s time to access and service the well.
If your well is a pitless adapter style of well, you may want to carefully and neatly remove the well cap and measure a depth to water in your well when it has not pumped for a period of time and record that measurement.
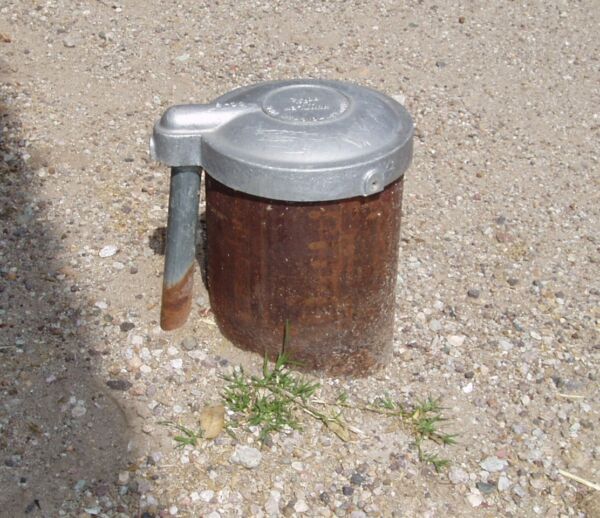
Pitless well cap
In areas where the depth to water is relatively shallow, this can be done with a tool we call a sounder. Water level measurements in your well a few times a year can tell you much about the performance of your well and detect changes that could save you costly maintenance repairs.
A hotlink to a published article on how private well owners can make their own water level measuring device from readily available materials can be found at the bottom of the page.
https://extension.arizona.edu/extension.arizona.edu/files/pubs/az1832-2020.pdf
If your water system has a bladder tank or tanks, then checking the air to water ratio in it or them could be the next most important inspection step you can make. Bladder tanks and hydropneumatic tanks both must have some ratio of air and water in them to perform properly.
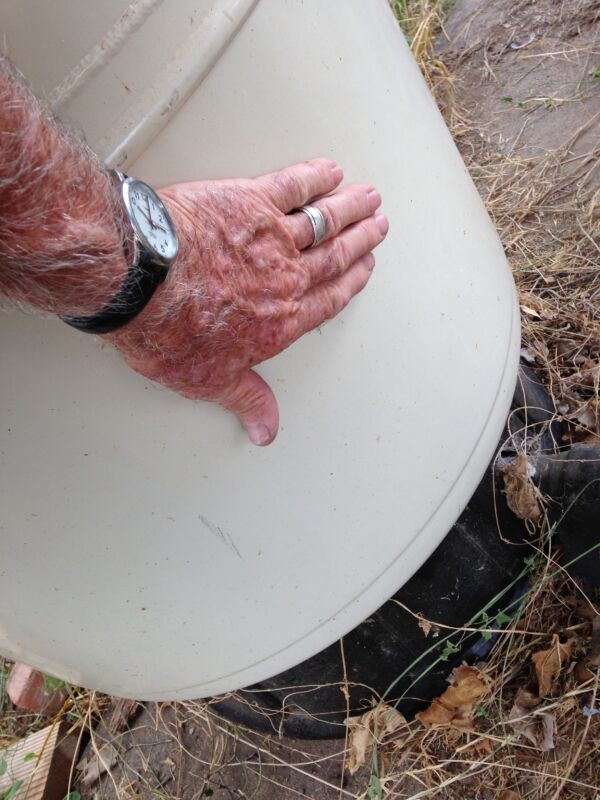
Feeling the side of a bladder tank
If there is too much or too little air in them, it can cause the well pump to rapid cycle and damage the motor. Place the palm of your hand on the side on the tank in both a high and low position. The surface of the tank should feel cool where there is water and warmer where there is only compressed air.
Note the relative volume of each. I sometimes use the base of my wedding ring to tap the metal of the tank for a clearer indication of the air and water contact. The sound is different when striking a metal tank with water in it versus air in it.
Turn off the electricity to the well for a moment. Note that you do or do not have a disconnect device that is clearly designated for control of the well and it is within at least 10 feet or less of the well head.
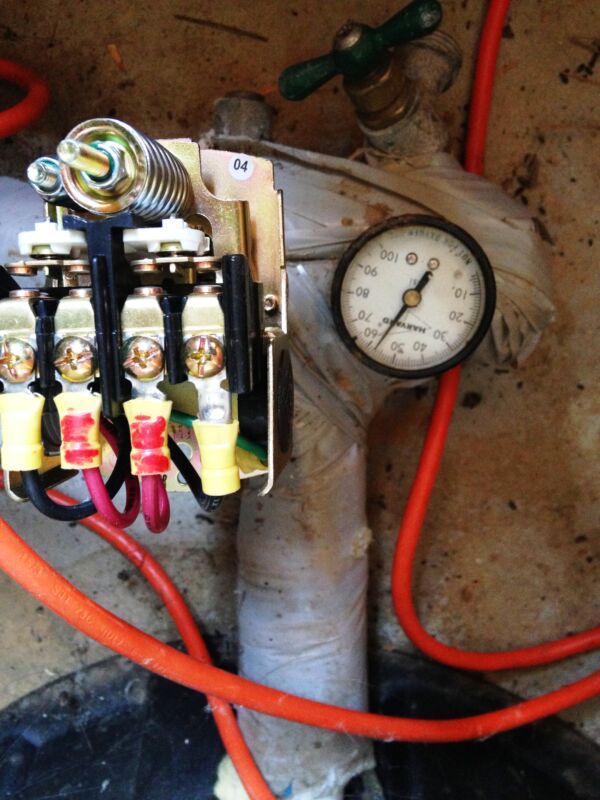
Pressure switch open
Once the power is off, you can remove the cover to the pressure switch and inspect the points of this device. If they look pitted and burned or cluttered with ant and spider remains, it might be best to have it replaced before it doesn’t work at all.
While the electricity to the well is off, you may want to drain out the water under pressure in the system. When all the water has been displaced from the bladder tank(s), the pre-charge pressure in the tank can be checked with a tire pressure gauge. The pre-charge pressure in the bladder tank with no water present in the tank should be two pounds less than the come-on pressure indicated in your pressure switch cover. If any remains in the tank when all the pressure has been drained off, then the bladder in the tank has failed.
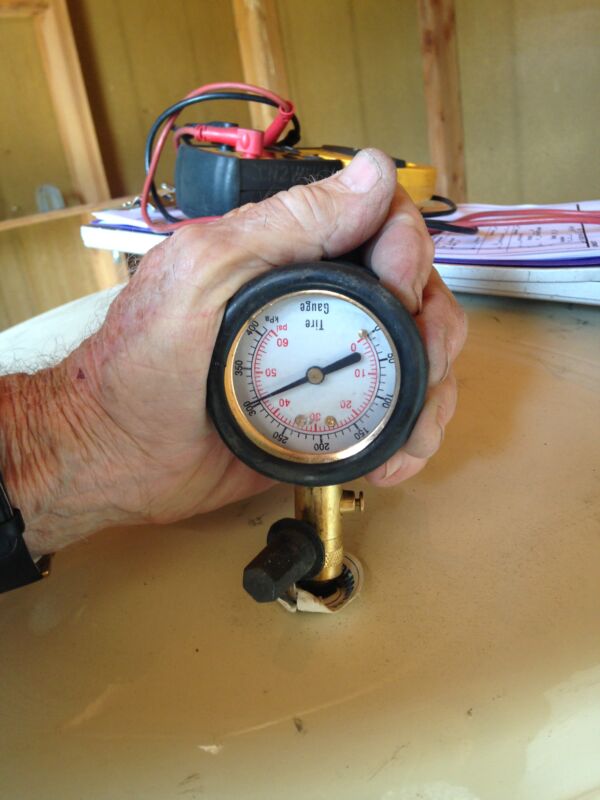
If water remains in the tank when all the pressure has been drained off, then the bladder in the tank has begun to fail. The tank should be replaced as quickly as possible. A waterlogged tank can damage a well pump motor in no time.
If the notation is still visible inside the pressure switch cover, it should be labeled that this switch was manufactured to come on at a pressure setting of (20 30, 40) and shut off at (40, 50, 60) psi. There should always be a 20-pound difference between the on and off setting. If you are fortunate to also have a pressure gauge on your water system, observe and record the values on the gauge as the pressure switch cycles the well pump.
Pressure switch set 50-70 PSI
If you happen to have a more modern style of pump control, what we call a constant pressure system, you won’t find a pressure switch. We will have to cover these styles of pump controller in a future blog.
Well owners who have wells equipped with water filters should remove, inspect, and replace filter cartridges. It is especially important to fully replace filters that have been inside the housing for several months of non-use.
Filters are strainers and collectors of everything that cannot pass through it. If left on the filter media in a warm environment for months, it will strongly encourage the growth of microbial colonies. All water filters should be inspected and changed frequently and especially after periods of non-use on warm days.
On the other extreme, check to see that any above-ground plumbing related to your water system is protected for cold weather conditions. Especially sensitive to freezing are the small diameter pipes that pressure switches are mounted on and the body of a pressure gauge.
These sensitive instruments must be protected from freezing with the foam-wrapped protection of electrical heating tapes that come on when temperatures drop close to freezing. The condition of these items should be a part of your seasonal well inspection and maintenance program.
There are other items we will discuss regarding protecting your private water well in future blogs. Gary’s personal recommendation for your well:
“Paint it gold and think of it as if it were . . . because it is.”
About the Author
 Gary Hix is a Registered Professional Geologist in Arizona, specializing in hydrogeology. He was the 2019 William A. McEllhiney Distinguished Lecturer for The Groundwater Foundation. He is a former licensed water well drilling contractor and remains actively involved in the National Ground Water Association and Arizona Water Well Association.
To learn more about Gary’s work, go to In2Wells.com. His eBooks, “Domestic Water Wells in Arizona: A Guide for Realtors and Mortgage Lenders” and “Shared Water Wells in Arizona,” are available on Amazon.
